Set Review ➟ 42094 Tracked Loader

2019 is just round the corner and the new LEGO Technic sets for the first half of the new year have been presented. In previous posts we showed you some details of the 42096 Porsche 911 RSR and 42095 RC Tracked Racer, so today we will start our review round with the 42094 Tracked Loader.
Set: 42094
Name: Tracked Loader
Pieces: 827
Price (in Spain): 64,99€
Traditionally the first wave of sets for each year contains the "smaller" sets and they tend to be somewhat more conservative. Rarely do se see something truly innovative or unknown, but although the Tracked Loader combines several elements we have seen in other models, it is not a reedition of an earlier Technic set. The model is quite original. Although treads and yellow are standard for LEGO Technic sets, the truth is there are several things that are worth taking a closer look at.
Construction starts with what has become the standard technique for many LEGO Technic sets: the cookie. The frame has become the basis for many models and this one is no exception. Two frames separated by 1 stud (or rather by a liftarm) form the start of the mechanisms of this set.
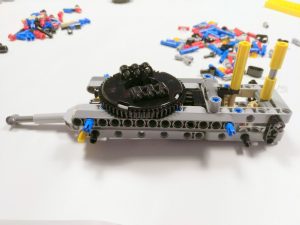
To the right you can see the mechanism that will control the linear actuator that raises and lowers the arm and to the left the one that connects to the turntable and allows you to rotate the cabin. You build the rear beginning with the winch.

The winch includes several improvements compared to the standard execution of this mechanism and they make this part of the set quite attractive. The mechanism includes a ratchet (which ends in a red bush) so avoid the string unwinding by itself, but that allows you to pull out the entire length of the string without having to use a winding mechanism.

To rewind the string there is a mechanism that allows for two speeds: tortoise—slow but powerful—and hare—fast, but with less force. You select the speed with the red selector and then turn the black 12t gear to wind the string.

The sticker on the mudguard / wing on the right side of the vehicle (as seen from behind) marks the position of the ratchet and the winding mechanism.

Another novel element in this winch is the “mouth” which can be oriented at 45º towards either side.

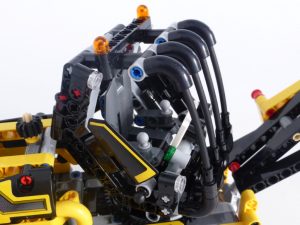
Up next is the cab. Again this element is fun to build. The construction is not particularly predictable and some of the "blam" is on the thin liftwarms—mind you, that is a good thing! There is a central control panel based on a 2x3 tile with a sticker and a couple of round tiles (a red and a green one), but the complement to the controls is included inside the doors and can be oriented at an angle that is comfortable to the operator.


After connecting the cab to the turntable with a couple of additional liftarms it is time to build the arm. The arm is raised and lowered by means of a mini linear actuator which is controlled from behind the cab. The following picture shows most of the mechanisms in the set:
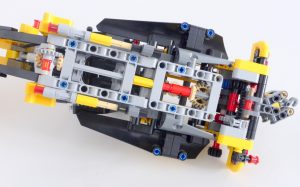
On the left side you can see the base of the mini LA and the axle that goes through the frames until it reaches the large (20t) tan bevel gear that leads to the control. Behind the red bush you can just see the two smaller tan bevel gears that are part of the mechanism to turn the turntable. To the right you can see part of the mechanism of the winch. in the bottom right corner you can see the ratchet mechanism. Left of that is the black 12t gear that serves to wind the string. This is connected to the gear selector that either connects the red 16t clutch gear or the new blue 20t clutch gear that first appeared in the Bugatti this year.
Finally, you build the treads. The instruction booklet has separate instructions for each side, but the sides are essentially identical. They are then connected together with the help of two 15-long liftarms and connected below the rest of the vehicle.

The spring looks great, but has very little function since the base of the tread is completely rigid. However, it does make the set look a lot better.
With the treads in place it is now time to have a look at how the arm works. It can make two movements. The first is raising and lowering the arm with the mechanism we saw earlier:

The second mechanism opens and closes the jaw. The mechanism is controlled from the red bush on the arm itself.

Finally a few words about the stickers. I am not a big fan of stickers, but the in this set the black and yellow colour scheme allows you to apply them without any of them looking discontinued. In addition, LEGO have created a new vehicle brand for this set: Brutalis, together with a logo that shows a rhino. The name of the model—ELEC 260—gives you a hint that this may be an electrical vehicle .

The set is fun to build as the construction process is entertaining. With 827 pieces, the price per piece is 7,85 ct.
I am curious to see the instructions for the B-Model, as the instructions for the main model announce some kind of integration with the LEGO Life app. It looks like whether I want to or not I will have to sign up for yet another social plaform.
To finish off, here is a video with a 360º view of the model and some pictures of the B-model. The box only contains instructions for the main model so te secondary model will have to wait until those instructions are available for download.
6790


