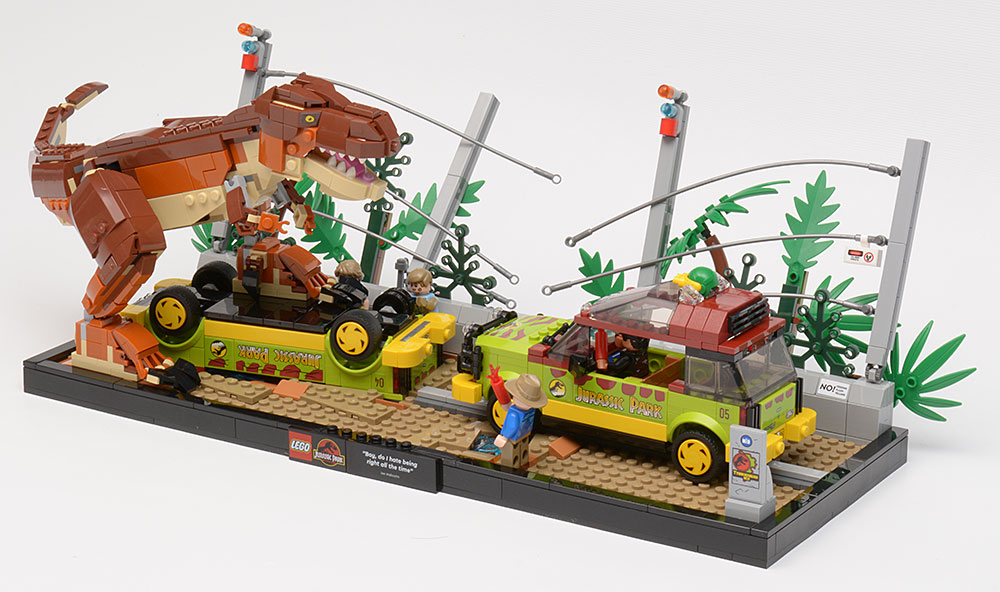
Set Review ➟ LEGO® 76956 T. Rex Breakout
Entering into this review, I was confused. I saw the set advertised on target.com as a Target exclusive. And I also see the set advertised on lego.com as being available on 6 May 2022.
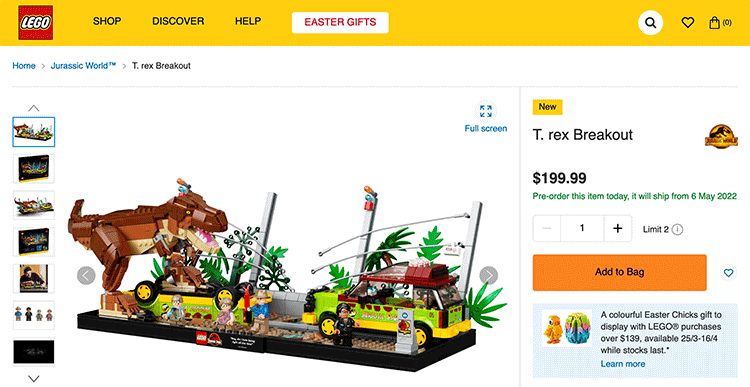
The product page at lego.com
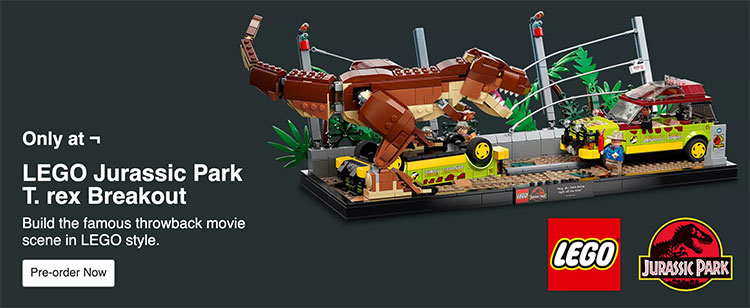
A lego promotion callout at target.com
Is that “Only at Target” a slogan? Side note: the flipped over L, reading “Only at ¬” that ¬ is supposed to be the Target logo, but this is what happens when designers attempt (and fail) to communicate by rebus in html. So the set is only available at Target, except it is available on lego.com, so, like I said: confused. Is this set available not at Target in countries where there is no Target? I don’t know.
This set of 1212 pieces, we assume…as that is what the web site says in two places (for once, and I didn’t count)…is rated for ages 18+ ($100US / 100€ / $200AU). That age rating has more to do with available funds, the ability to apply many stickers in a not-crooked or underlying-with-cookie-crumbs-and-dog-hair fashion, and, likely, that this is a display piece not intended for play. Assembly-wise, other than the aforementioned stickers, I doubt this would be too challenging for an 8-year-old to assemble.
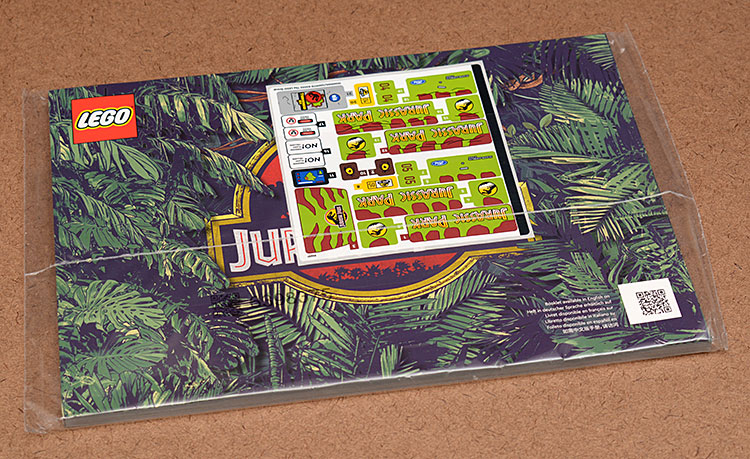
The instruction book is polybagged with the sticker sheet. This is nice in that the sticker sheet has remained flat and isn’t curled up or folded or subject to any number of loose-in-the-box sticker sheet mishaps like peeling off and getting affixed to the instructions. As with other higher-end adult-oriented sets, the instruction book has some comments from the designers and a few other theme-related feel-good fluffy tidbits.
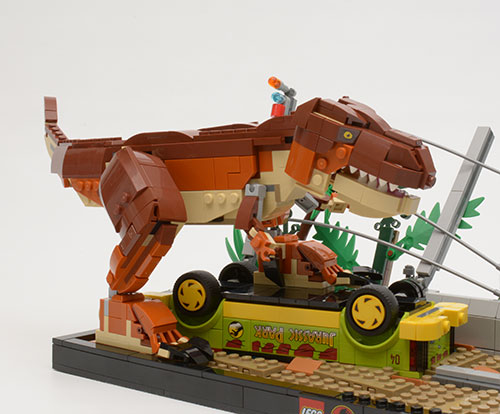
The hip kids are calling these types of sets the “Quote Sets”…these diorama sets intended for display, framed by a base with a quote from the movie put on a tile. This set depicts the famous mid-movie T. Rex scene from the original Jurassic Park. The quote tile, the LEGO Jurassic Park tile, and the seven yellow hubcap tiles are the only printed pieces in the set. The rest of the decorative pieces are stickered.
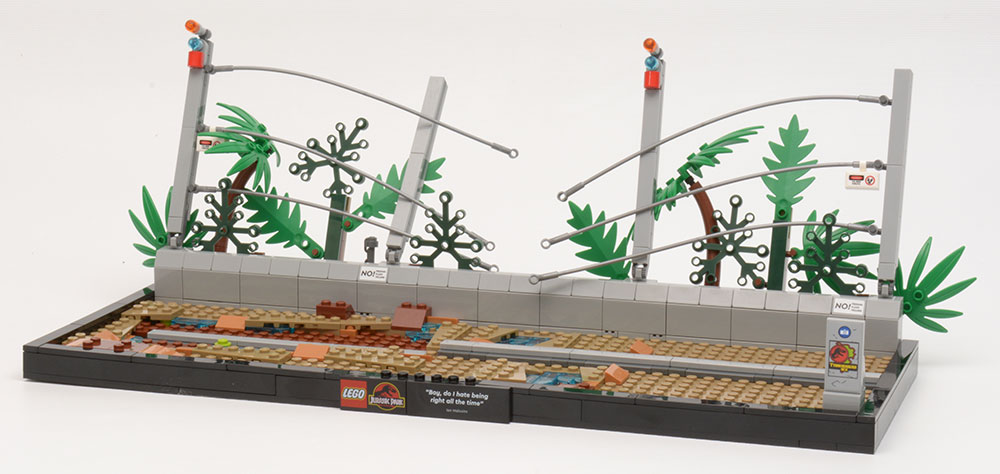
The Base
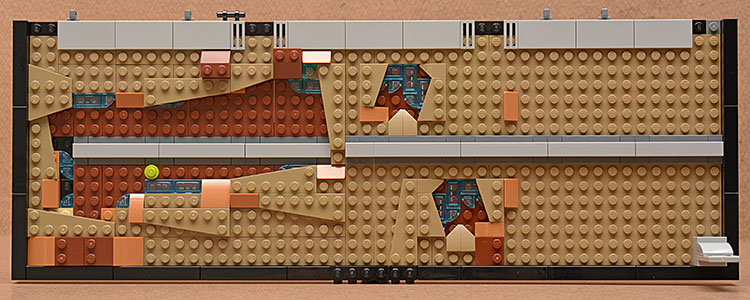
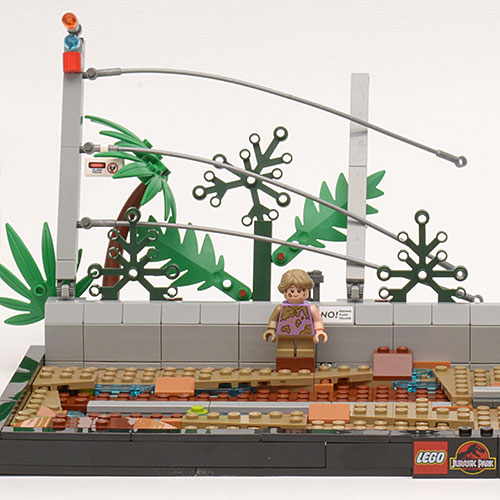
The black base for the set is sturdy upon completion. The interior is designed to evoke the muddy ground from the scene in the movie. There is a hollow into which the overturned vehicle will fit, to be secured by a single lime green stud. There are two additional hollows which are supposed to represent T. Rex tracks in the mud. One has to use their imagination a little bit to grok that detail and the tracks are a different size and shape from the model’s T. Rex’s foot. Slow-witted people like myself are assisted in the revelation that these angular holes are supposed to be muddy footprints by a helpful callout in the instructions.
The hole for the overturned vehicle.
The overturned vehicle in the hole.
The dinosaur foot next to it’s supposed footprint.
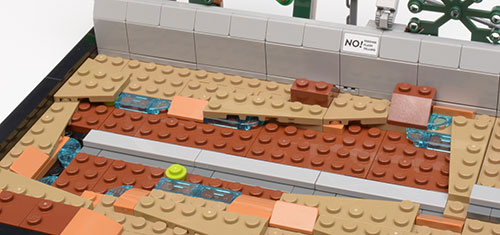
In the build process, a number of trans light blue pieces are used to represent water—mud puddles—on the ground. Some of these pieces are subsequently hidden by other plates placed over them. I don’t really understand why the model designers bother with this kind of detail that ends up hidden in the end, but I have seen it several times in other models and figure this must just be Easter Egg self-gratification on the part of the designer.
There are a few seemingly random slopes and tiles placed in the base. Later we will find these to be little platforms onto which the minifigures and dinosaur perch, presumably to raise their height so they are less hidden behind other parts of the model. The slopes intended for the little kids, and especially the girl, are kind of oddly positioned behind the overturned vehicle and behind the dinosaur’s foot, and therefore the kid figures end up largely hidden in the diorama as designed. This is disappointing given that there was some degree of attention paid to the scene-appropriate muddy design of these minifigures.
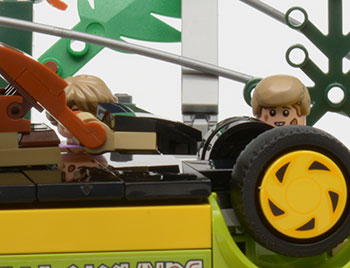
Hello.
Yes, we are hiding…
by standing on slopes behind a wreck.
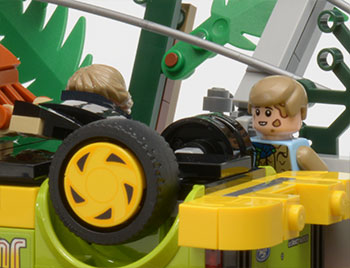
The completed base does a wonderful job of evoking the movie set. The bent fence and broken wires really sell the scene. Besides the lights on the posts and the various warning signs, there is the added touch of the goat stake. Unfortunately this is positioned behind the overturned vehicle, a child minifigure, and the dinosaur’s foot, so that flourish is easily lost.
Just peeking out above the NO sticker on the left you can see the goat stake.
Then a figure is placed in front of it…
…and then a dinosaur…and it is lost.
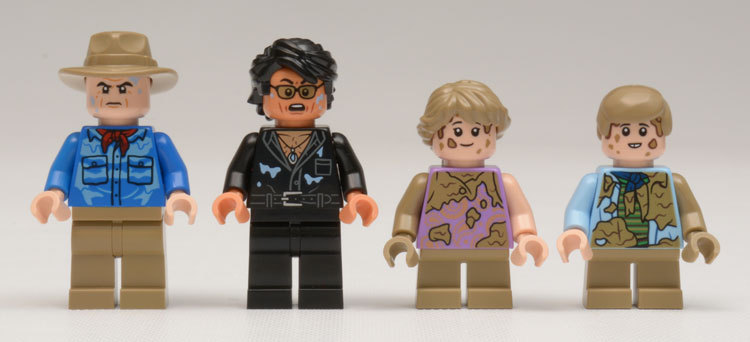
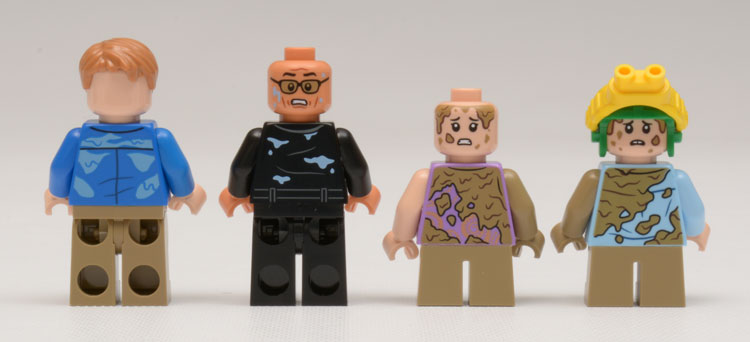
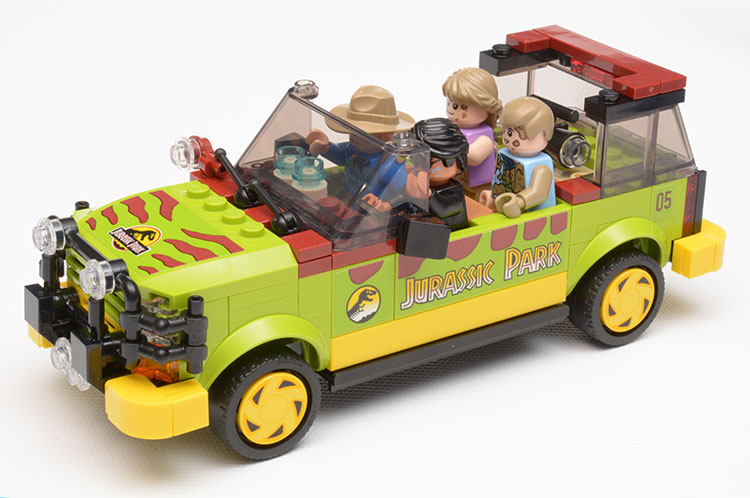
The Minifigures
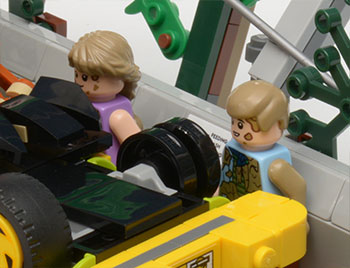
The set contains four minifigures which represent the characters of Alan Grant, Ian Malcolm, Lex Murphy, and Tim Murphy. All figures have dual-side printed torsos; all except Grant have dual-side printed heads. Grant and Tim come with additional headgear: Grant with a wig and Tim with a night-vision helmet. All figures have monochrome undecorated legs. There is a whimsical touch in the design decision to include one dark tan arm on each of kid figures to represent mud.
The Vehicles
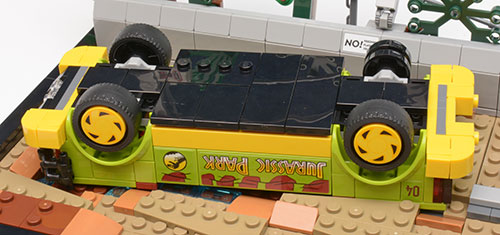
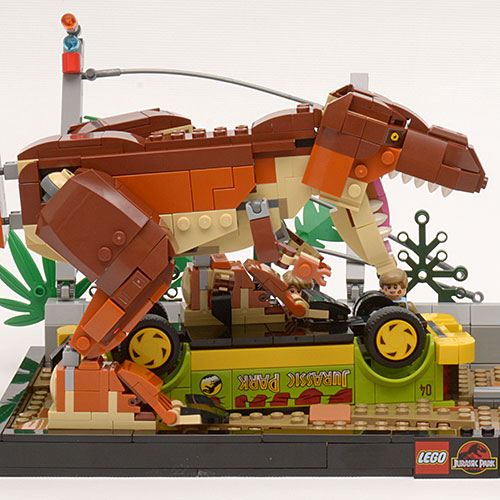
The set contains two vehicles with identical aesthetic, one is functional and the other is overturned and “crushed” by the dinosaur.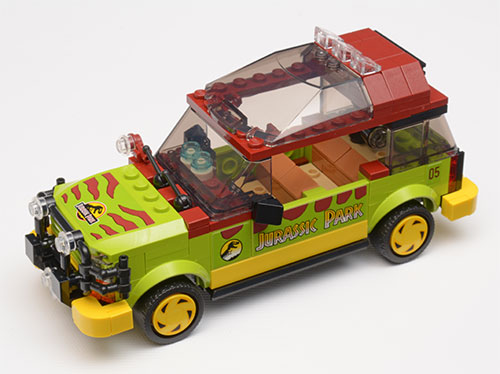
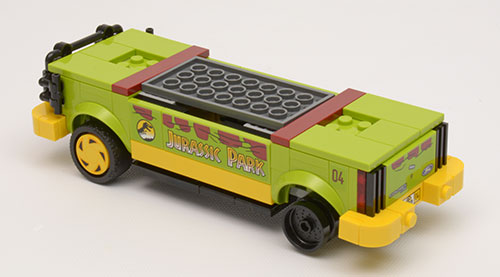
The functional vehicle has a bit of deviation from the typical LEGO vehicle design. Instead of panels, bricks, or doors, this build uses SNOT-mounted tiles for the door panels. Also used are antenna/levers to represent windshield wipers…this is a detail that has been used sparingly on vehicles in the past. The vehicle also uses single-mold hard plastic wheels instead of the usual hard plastic wheel mated with a rubber tire. This decision is probably to facilitate the use of printed round 2x2 tiles to emulate the hubcaps of the vehicles in the movie. This choice is fine for a display piece where ride comfort of passengers is not a factor.
The vehicle gets covered in stickers to emulate the paint job on the vehicles in the movie. Of particular interest to me was the inclusion of the FORD logo and the Explorer branding on the tailgate sticker. I wonder what the licensing agreement for that little detail entailed. Somebody at LEGO or at Universal or both went through some paperwork at some time to bring us this little detail.
At the bumpers, the vehicle measures just shy of eight studs wide. At the chassis, the vehicle is six studs wide and the interior will accommodate four passengers provided their arms are positioned such that they don’t interfere with one another and with the vehicle sides.
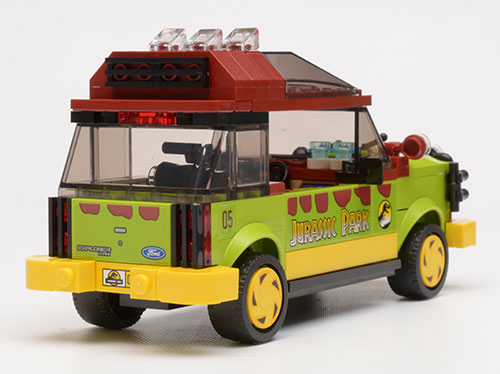
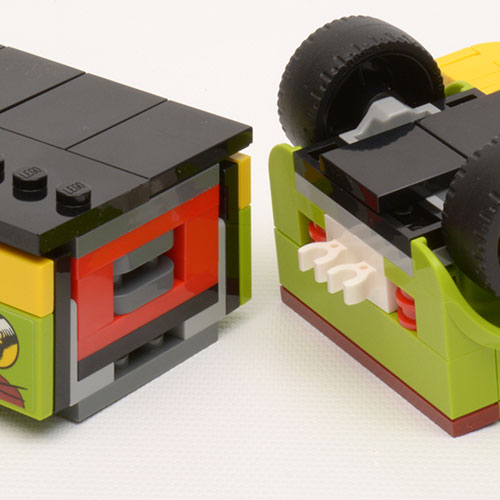
The overturned vehicle was the most interesting part of the build for me. While maintaining the aesthetic of the functional vehicle, there were some interesting design and assembly points to this piece of the model.
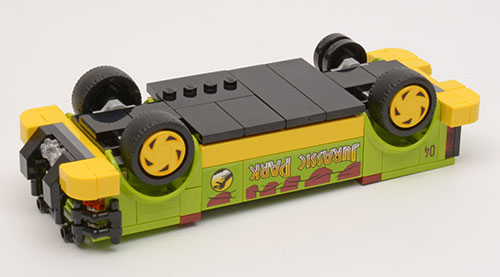
The basic aesthetic is identical to the other vehicle minus the glass and roof. The front grille is kept, and considerations in the base to accept the higher rise of the grille compared to the hood allow the vehicle to sit flat within the base. The center of the vehicle is built in the typical stud-up fashion. Either end of the vehicle with the wheels is built “upside down” allowing for the use of the same wheel well fender flare pieces as on the other vehicle.
The “top” of the overturned vehicle.
The “bottom” of the overturned vehicle.
Clever use of the 77808 brick coupled with some clips allow for the upside down parts to seamlessly fit with the right side up part to finish in a smooth plane for the underside of the vehicle.
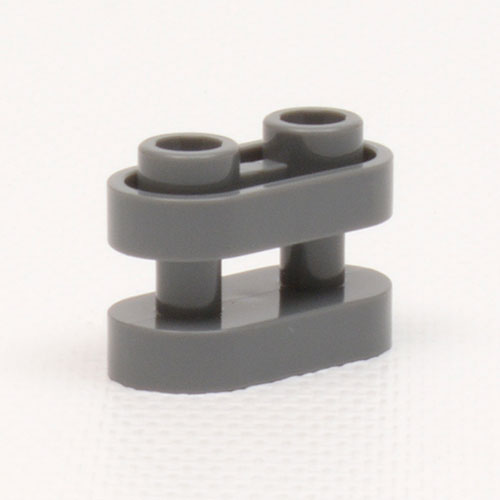
The 77808 piece.
The middle-to-end joinery. The section on left is built stud-up; the section on right is built stud-down.
Typically we will see some sort of technic brick-and-pin joinery for this kind of assembly, but technic brick-and-pin would yield a half-plate stepped junction point. Pat on the back to whichever designer solved this problem.
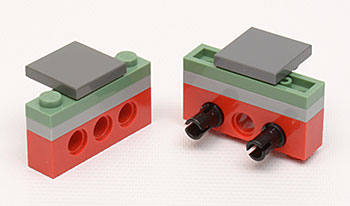
Typical technics brick-and-pin joinery…
…stud-up versus stud-down going together…
…results in a 2/3-plate offset.
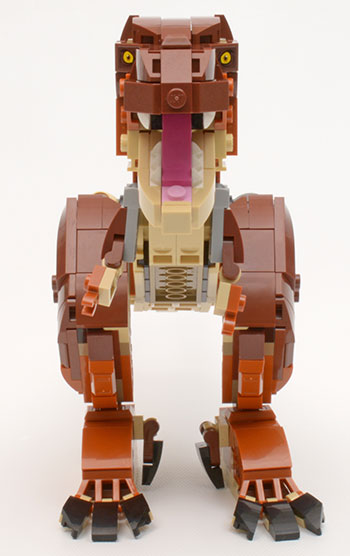
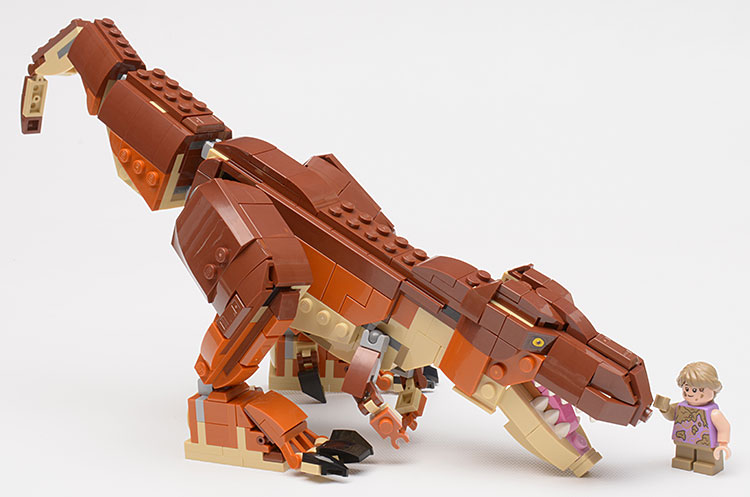
The Tyrannosaurus Rex
In this model we have a brick built dinosaur. The T. Rex here is slightly larger than the molded T. Rex available in the other contemporary T. Rex Breakout set.
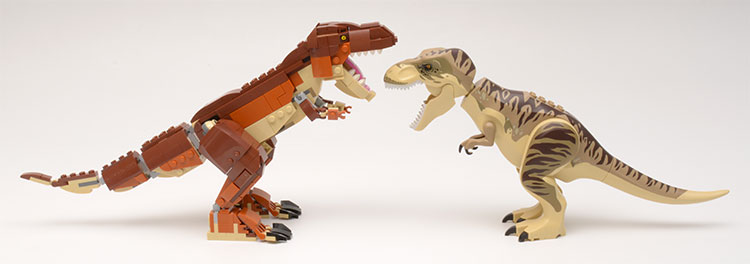
Brick-built vs molded T. Rexes.
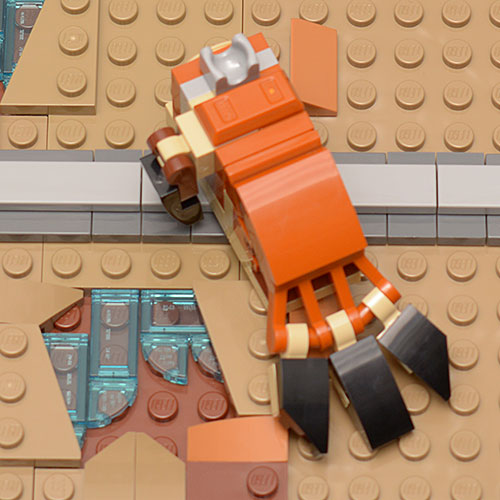
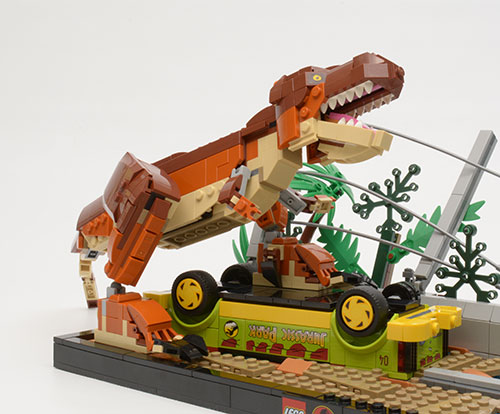
The head has some design hits and misses. There is a wonderful choice of bricks leading to the sculpting of the nose and especially the implication of nostrils. The choice of the happy pinks for the mouth along with few big rounded teeth make the mouth feel more cartoon like than threatening. I do not know why the artist decided that using a spider for the pupil in the eye was a good choice. The absence of the signature T. Rex eyebrow ridge makes the head more beagle-shaped and less threatening looking. The head does move up and down at the neck on a fingered hinge, but only two clicks yielding three positions.
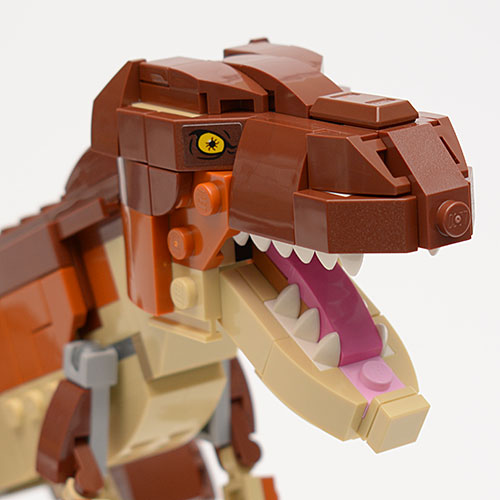
The brick-built head with happy pink mouth, few teeth, spider for a pupil, and no eyebrow ridge.
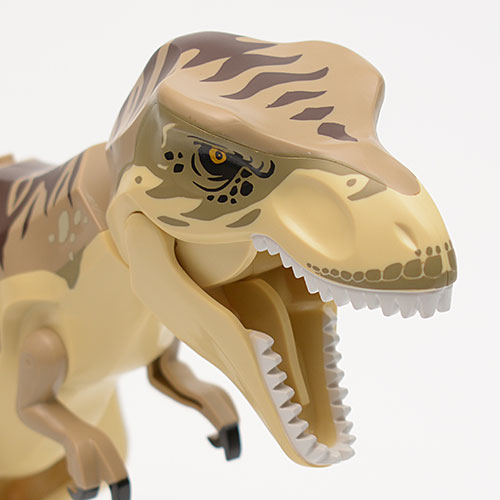
The sculpted head with heavy brow ridge, lots of teeth, and serpent tongue looks far more menacing.
The dinosaur has some odd proportions: its head is wider than its torso and its thighs are wider than its torso. Face-on the dinosaur just looks odd and the absence of front teeth does not help. In profile, and I am sure this is the intended view, the dinosaur looks okay. As is most often the case with LEGO brick-built figures, the knees are fixed and not jointed while the figure does get elbow joints. The tail is segmented with most segments joined by small ball-and-socket joints and the last segment with a clip-and-bar.
All I want for Christmas is my two front teeth.
If I were given to hyperbole and not, you know, wry sarcasm, I would call these feet a disaster. Instead I will just say that they possess some design choices which just might maybe possibly be considered problems. Problem one: they look more like the feet of Oderus Urungus than that of a T. Rex. Research Oderus Urungus at your own peril. It is quite possible Oderus Urungus is scarier than any T. Rex. Quite. Possible.
Problem two: the toes. Were the toes in plane with the piece they are attached to, there likely would not be a problem. As the 92692 plate the toes are attached to is angled on the rocker plate and has a curved perimeter, the toe parts come closer together as the angle increases. Given the design is about at its angular limit, any further pressure increasing the angle forces the sides of the toes to push against each other and can easily pop off the holding bars. This means no positioning the dinosaur with his heel up and his toes down.
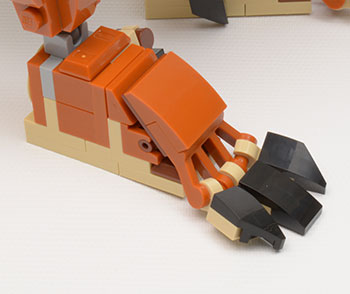
Sides of the toes are pretty close to touching when in the designed position.
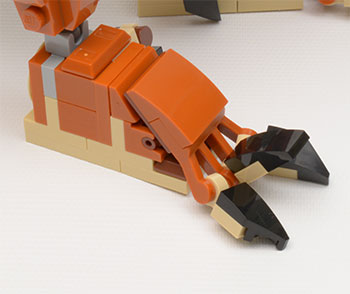
One toe can be rotated towards the top of the foot without incident.

Moving all toes towards the top pops the outer ones off.
Problem three: the rocker plate assembly. The toes assembly is a 92692 plate attached to a rocker panel. Above the rocker assembly is a slope brick intended to limit the angle of the rocker panel, which it does. However, while it limits the angle of the rocker panel, when upward pressure is applied at the toes the rocker panel acts as a lever and the slope as a fulcrum. The resulting force pulls the rocker base off the attaching studs and the toes assembly falls off. Think of a claw hammer pulling out a nail and you will get the idea. This “disassembly feature” functioned frequently and effortlessly during the photo shoot and while moving the model around. As the model is supposed to be a display piece, once positioned there should not be a further issue, but this would be really bad if this were to be a play piece.
The toes assembly connects to the foot via the rocker base.
Upward pressure on the toes pushes the rocker panel against the slope piece…
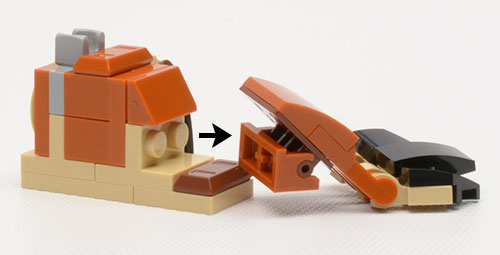
…and pulls the rocker base out of position.
Problem four: the ankles. The ankles are small ball and socket joint assemblies. These are quite small pivot points holding up a relatively heavy assembly, and as such do not seem to provide sufficient friction to maintain an infinite variety of poses. While it is obvious that some play at the hips and rotational freedom on three axes at the ankles was required to get the dinosaur into the desired position…with one foot beside and the other atop the overturned vehicle…the tradeoff was stability.
A small ball-and-socket is used for the ankle.
With the dinosaur’s feet placed on the model, the body slides easily and loosely between the extremes of possible positioning. With some degree of fussing, the dinosaur can be placed into a desired position, but if that position is not weight balanced don’t be surprised if it slowly (or maybe not so slowly) slides into some other position after some time. There is some play available at the hips, and that can be key to getting an acceptable position. Again, if the dinosaur is positioned more-or-less as intended…as a display piece…it will probably be okay. If you want to get creative and precise with the dinosaur’s positioning, you may be disappointed. I found that messing with the dinosaur’s position was pretty fussy. The toe assembly would pop off at the rocker base, the foot would pop off at the ankle, nearby pieces like the minifigure may get knocked off, the foot on the car comes loose from the car easily, and so on.

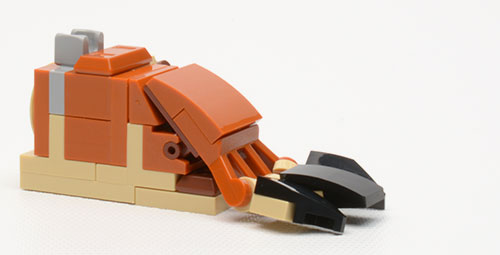
The dinosaur can be placed into several positions.
Some positions look pretty good.
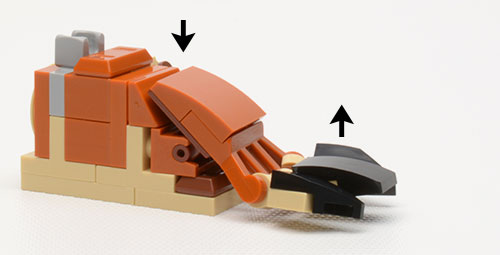
But the ankle joints are weak.
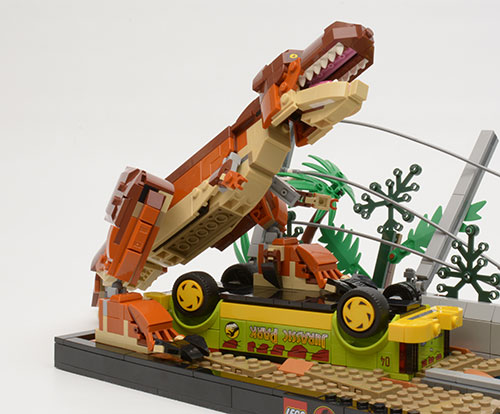
And the dinosaur may slide into something weird.
The Randolph T. Fielding Absolutely Administrivia Section
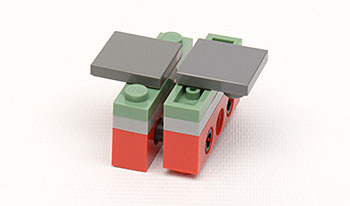
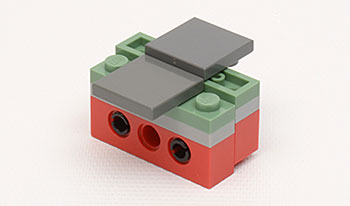
The 51274 tail segment piece, used here as a tree trunk, has a squared pin hole and should not be confused with the similar, older, 40378 piece with a round pin hole.
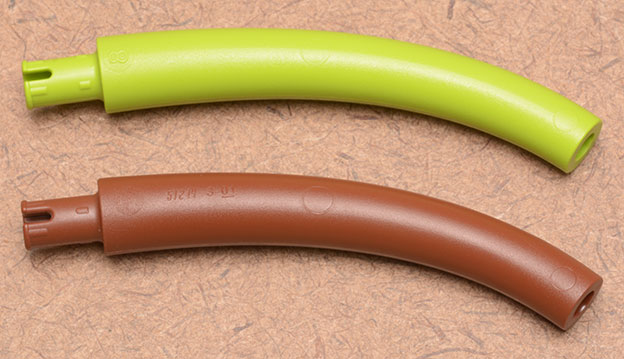
Top: 40378. Bottom: 51724
Left: 40378. Right: 51724
For whatever reason, the 43876 1x2 plate with 5.7mm L-bar has replaced the 88072 version found in other earlier sets—same design, new mold number. I wonder if many of these recent number changes to existing designs is related to the transition from oil-based to plant-based plastic.
Closing Thoughts
It would have been nice if the marketing department could have better differentiated the names of this set and the 76948 T. Rex and Atrociraptor Dinosaur Breakout. Having two sets that are “T. Rex Breakout” is bound to disappoint someone who wants one and will get the other because mom or grandma doesn’t know that there are two distinctly different but similarly named sets.
Fitting this set next to another diorama set on a shelf may be problematic. Side-to-side, the model’s base is 50 studs wide. The dinosaur’s tail extends up to 18 studs past the end of the base, and foliage parts on either end of the back extend past the 50. Front-to-back the model’s base is 18 studs deep. The foliage and fence posts on the back extend anywhere from a minimum of about 8 studs to a maximum of 13 studs deeper…meaning this model will likely need to sit closer to the front of a shelf than to the rear.
To me, this T. Rex is not the terribly frightening and threatening T. Rex from the movie. This T. Rex with his lack of prominent brow, few big teeth, missing teeth, happy pink mouth, and slightly odd proportions is more akin to Rex from Toy Story. Good thing it isn’t green.
The set does a good job evoking the representative scene from the Jurassic Park movie and is clearly intended for adults as a display piece. If it is considered as such by the owner, the owner should be perfectly satisfied with it.
Hello there nice dinosaur. Want to be friends?
Disclaimer
My thanks to LEGO for providing the review set. Opinions and observations expressed were not influenced by, but may be shared by others.
33522


